As a standard part, threads play an important role in the connection and transmission of machine parts. It is also common to process threads during maintenance. The accuracy of threads has a direct impact on their connection and transmission. Thread detection methods are also necessary.
Ⅰ. Measure With Thread Ring (plug) Gauge and Card Plate
For general standard threads, thread ring gauges or plug gauges are used to measure, as shown in Figure (a). When measuring external threads, if the "over end" ring gauge of the thread just screws in, but the "stop end" ring gauge does not screw in, it means that the processed thread meets the requirements, otherwise it is unqualified. When measuring internal threads, use a thread plug gauge and measure in the same way.

Figure (a)
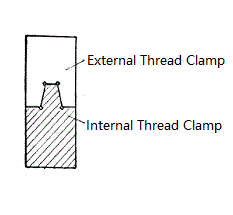
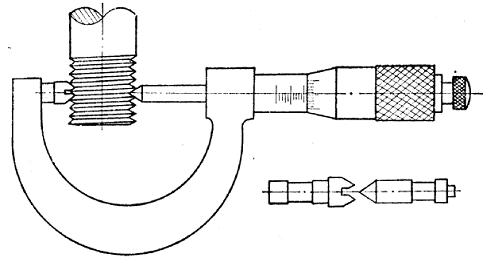
Figure (b) Figure (c)
When using thread ring or plug gauges, be careful not to use excessive force or hard-screw with a wrench. When measuring some special threads, you must make your own thread ring (plug) gauge, but its accuracy should be guaranteed. For threaded workpieces with larger diameters, thread profile clamps can be used for measurement and inspection, as shown in Figure (b).
Ⅱ. Measure with a Threaded Micrometer
The thread micrometer is used to measure the pitch diameter of the thread, as shown in Figure (c). It is generally used to measure triangular threads. Its structure and usage are the same as the outer diameter micrometer. It has two contacts with the same thread profile angle, one One is in the form of a cone and one is in the form of a groove. A range of measuring contacts are available for different profile angles and pitches.When measuring, the two contacts of the thread micrometer are stuck on the tooth surface of the thread, and the reading obtained is the actual size of the pitch diameter of the thread.

Figure (d)
Ⅲ. Measure with Tooth Thickness Vernier Caliper
The tooth thickness vernier caliper consists of a mutually perpendicular high caliper and a tooth thickness caliper, as shown in Figure (d), and is used to measure the trapezoidal thread medium diameter tooth thickness and worm pitch diameter tooth thickness.When measuring, adjust the tooth height caliper reading to the tooth top height (the trapezoidal thread is equal to 0.25 * pitch t, and the worm is equal to the module), and then make the tooth thickness caliper and the worm axis roughly intersect to form a thread rise angle β, and make a small amount of swing. The minimum size measured at this time is the normal tooth thickness Sn of the worm axis pitch diameter.The normal tooth thickness of the worm (or trapezoidal thread) pitch diameter can be calculated in advance using the following formula:
Sn=![]() t*cosβ
t*cosβ
Base: Sn: worm (or trapezoidal thread) pitch diameter and normal tooth thickness, t: worm circumferential pitch, β: thread rise angle
Example 1: How to use a tooth thickness vernier caliper to measure a worm with module mn=6, number of heads K=2, and outer diameter da=80mm?
When measuring, you should first calculate:
Worm pitch t=mn*π=6*3.142=18.852mm
Worm lead L=t*k=18.825*2 = 37.704mm
Worm pitch diameter d = da-2* ms=80-2*6=68.00mm
Helix angle β = ![]() =
= ![]() =
=![]() = 10°1ˊ
= 10°1ˊ
Normal tooth thickness at worm pitch diameter
Sn=![]() t*cosβ=
t*cosβ=![]() *18.825*cos10°1ˊ=9.28mm
*18.825*cos10°1ˊ=9.28mm
The tooth thickness vernier caliper should be measured at an angle of 10°1ˊ with the worm axis. If the actual size of the measured normal tooth thickness at the worm pitch diameter is 9.28 mm (there is some deviation due to the tooth thickness tolerance), then Indicates that the worm tooth shape is correct.
Three-pin Measurement Method
The method of measuring the pitch diameter of a thread with a measuring needle is called the three-needle measuring method. When measuring, place three measuring needles with the same diameter D in the thread groove, as shown in Figure (e), and then use an appropriate measuring tool (such as a micrometer, etc.) Measure the size of dimension M to verify whether the pitch diameter of the thread being processed is correct.Calculation formula for thread pitch diameter:
d2=M-D  +t
+t![]() t*ctg
t*ctg ![]()
M: Value measured by micrometer (mm), D: Measuring needle diameter (mm), α/2: Tooth shape half angle, t: Workpiece pitch or worm pitch (mm)
Calculation formula of measuring needle diameter D:
D=![]()
![]()
If the thread profile angle is known, the following simplified formula can also be used to calculate:
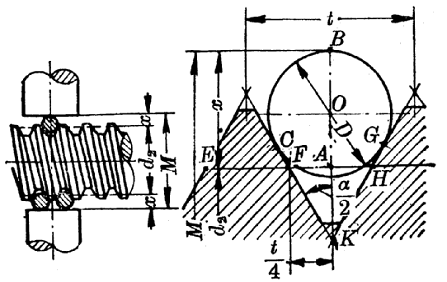
Figure (e)
| Thread profile angle α | Simplify the formula |
| 29° | D=0.516t |
| 30° | D=0.518t |
| 40° | D=0.533t |
| 55° | D=0.564t |
| 60° | D=0.577t |
Example 2: Measure the thread of M24*1.5 with three needles. It is known that M=24.325. What are the measuring needle diameter D and thread pitch diameter d2 required?
Substituting α = 60° into D=0.577t, we get D=0.577﹡1.5=0.8655mm
d2=24.325-0.8655(1+1/0.5)+1.5﹡1.732/0.5=23.0275mm
The difference from the theoretical value (d2=23.026) is △=23.0275-23.026=0.0015mm, which shows that the difference is very small.
In fact, the pitch diameter of the thread can generally be found from the thread standard or directly indicated on the part drawing. Therefore, as long as the above formula for calculating the pitch diameter of the thread is moved and transformed, it can be calculated that the micrometer should measure The resulting reading formula:
M=d2+D -
-![]() t*ctg
t*ctg![]()
If the tooth form angle is known, it can also be calculated using the following simplified formula:
| Thread profile angle α | Simplify the formula |
| 29° | M=d2+4. 994D-1.933t |
| 30° | M=d2+4. 864D- 1.886t |
| 40° | M=d2+3.924D-1374t |
| 55° | M=d2+3. 166D- 0. 960t |
| 60° | M=d2+3D- 0.866t |
Example 3: Use the three-pin measuring method to measure the thread of M24*1.5. It is known that D = 0.866mm and d2 = 23.026mm. Find the reading value that the micrometer should measure?
α = 60° Substituting into the above formula
M = d2+3D-0.866t = 23.026+3﹡0.866-0.866﹡1.5=24.325mm
Two-Needle Measurement Method
The two-needle measurement method is more widely used than the three-needle measurement method. For example, threads with a small number of thread turns and threads with a large pitch (pitch greater than 6.5) are inconvenient to use the three-needle measurement method, and the two-needle measurement method is used. The measurement is simple and feasible. For ordinary threads, the tooth profile angle α =60°, as shown in Figure (f).
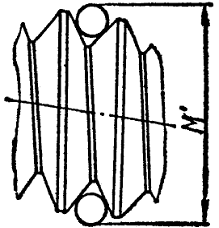
Figure (f)
d2=Mˊ-3D-![]() +0.866tMˊ: Measuring size using double-needle measuring method (mm)
+0.866tMˊ: Measuring size using double-needle measuring method (mm)
(The meanings of d2, D and t are the same as before and are no longer marked in Figure (f) )
As can be seen from the above formula, the first and third terms on the right side of the formula both contain the Mˊ value, and the Mˊ value needs to be calculated before measurement. It is inconvenient to directly apply the above formula to calculate the theoretical Mˊ value. The above formula needs to be corrected. It can be obtained through simplification in order to accurately control the Mˊ size during processing and ensure that the thread pitch diameter d2 is qualified.
The calculation of the Mˊ value for measuring the thread pitch diameter using the double-needle measuring method is as follows:
The above formula is transformed into:
d2=(Mˊ-D)-2D-![]() +0.866t
+0.866t
Assume Mˊ-D = x. The above formula becomes:
d2= x-2D-![]() +0.866t
+0.866t
Transform the above formula into: 8 x d2= 8 x2-16 x D-t2+0.866(8 x) t
After sorting it becomes: x2+(0.866 t-2 D-d2) x-![]() =0
=0
Solve for x
x 1=![]()
![]()
x 2=![]()
![]()
Dropping the root x 2 and retaining x 1 gives:
x =![]()
![]()
Substitute the above equation into Mˊ-D = x to further solve for Mˊ:
Mˊ=![]()
![]() +D
+D
This is the formula for measuring the theoretical value Mˊ of ordinary thread pitch diameter using the double-needle method.
Example 4 Use the double-needle measuring method to measure the thread of M12 (6h).
It is known that D = 1.008mm, d2 = 10.863.What is the reading obtained when measuring using the double-needle measuring method?
M12 coarse thread α = 60° pitch t =1.75mm
M'=![]()
![]() +D
+D
=![]()
![]() +1.008=12.4051mm
+1.008=12.4051mm
The thread pitch diameter itself has tolerances, and the measured values also have a range.
Since threads are standard parts and are widely used, it is a common task to check whether their accuracy meets the standards. The several measurement methods introduced above are also commonly used. We hope that their induction, summary, derivation and deduction will be helpful to the detection work.


